Making candles at home is a relaxing and creative skill that many people enjoy. It saves money, gives full control over materials, and lets you design candles just the way you want. One of the most important parts of candle making is the wick because it controls how your candle burns. If the wick is not made properly, the candle may burn too fast, too slow, or even produce smoke. Learning how to make a candle wick at home can completely change your candle-making experience and improve the final result.
When you understand the basics of wick making, everything becomes easier. You don’t need expensive tools or complex materials to get started. With a few simple household items, you can create strong and clean-burning wicks. This guide will walk you through each step in a very simple way so anyone can follow along, even beginners. By the end, you will feel confident making your own wicks and using them for different types of candles.
Understanding Candle Wicks and Their Role
A candle wick is the small string-like material that helps the candle burn. It pulls melted wax upward and keeps the flame alive. Without a good wick, even the best wax will not burn properly. That is why learning how to make a candle wick is so important for anyone who wants to make candles at home.
Wicks control the size of the flame and how evenly the wax melts. If the wick is too thick, the candle will burn too fast and create smoke. If it is too thin, the flame may keep going out. A balanced wick gives a steady flame and smooth burning experience. This balance is what makes handmade candles look and perform professionally.
Wicks are usually made from cotton, wood, or braided fibers. Cotton is the most common because it is easy to shape and burns cleanly. Understanding this basic role helps you choose better materials and avoid mistakes when making candles at home.
Will You Check This Article: Cost Air Conditioner Coil Replacement Guide & Pricing 2026
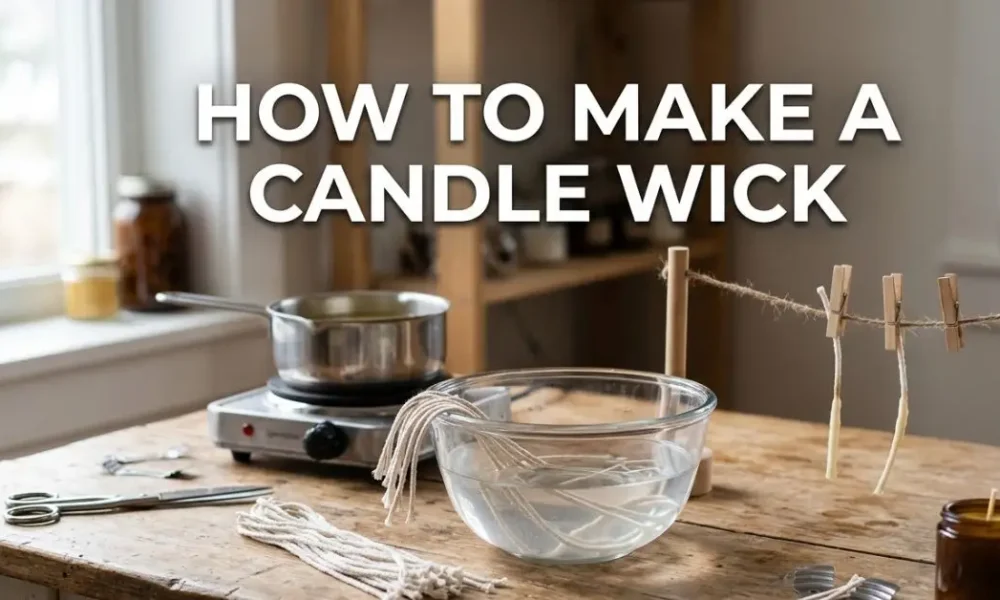
Materials Needed for Making Candle Wick
Before starting the process, it is important to gather all the materials. You don’t need anything expensive or hard to find. Most of these items are already available in your home or nearby shops. If you are learning how to make a candle wick, preparation is the first step to success.
You will need cotton thread, salt, borax powder, water, scissors, and a container for soaking. Cotton thread is the base of the wick, so try to choose a strong and natural one. Avoid synthetic threads because they may melt or produce smoke while burning.
The salt and borax solution helps the wick burn slowly and evenly. It also strengthens the fibers so the wick does not break easily. A small glass or bowl is enough for soaking the wick mixture. Having everything ready makes the process smooth and stress-free.
How to Make a Candle Wick Step-by-Step at Home
Learning how to make a candle wick is simple if you follow each step carefully. Start by mixing warm water with salt and borax in a bowl. Stir it well until everything dissolves completely. This solution will help treat the cotton thread and improve its burning quality.
Next, take your cotton thread and soak it in the mixture for about 12 to 24 hours. This allows the fibers to absorb the solution fully. After soaking, remove the thread and hang it to dry completely. Drying is important because a wet wick will not burn properly and may produce smoke.
Once the wick is dry, dip it in melted wax for a few seconds. This coating helps the wick stay stiff and burn evenly. Let it cool and straighten it before using it in a candle. Now your homemade wick is ready to use, and you have successfully learned how to make a candle wick in a practical way.
Choosing the Right Cotton and Thickness
Choosing the right cotton is very important for making a good wick. The quality of cotton affects how smoothly your candle burns. When practicing how to make a candle wick, always select natural cotton threads because they burn clean and steady.
Thickness also plays a big role. A thicker wick is suitable for large candles because it produces a bigger flame. A thinner wick works better for small candles. If the wick is not matched properly with the candle size, it may cause uneven burning or waste wax.
It is also a good idea to test different thread sizes before making a large batch. This helps you understand which thickness works best for your candle type. Small experiments can lead to much better results and improve your candle-making skills.
Treating and Strengthening the Wick
After choosing the cotton, the next step is treating it so it burns properly. This step is often skipped by beginners, but it is very important. In how to make a candle wick, treatment is what makes the difference between a weak wick and a strong one.
The borax and salt solution helps strengthen the fibers and reduces quick burning. It also helps the wick resist bending when placed in wax. Without treatment, the wick may burn too fast or break apart during use.
Once treated, coating the wick with wax gives it structure and stability. This wax layer helps the flame start easily and stay steady. It also reduces smoke and improves the overall burning quality of the candle.
Testing Wick Performance at Home
Testing your wick is a key part of the process. Even if you follow all steps correctly, you still need to check how the wick performs. When learning how to make a candle wick, testing helps you understand what works and what needs improvement.
Place your wick in a small candle and light it carefully. Observe the flame size, smoke level, and how evenly the wax melts. A good wick will burn steadily without producing too much smoke or soot.
If the flame is too big, the wick may be too thick. If it keeps going out, it might be too thin. Adjusting the wick size and trying again helps you perfect your technique over time.
Common Mistakes While Making Candle Wick
Many beginners make small mistakes that affect the final result. One common mistake is not soaking the wick long enough. This weakens the burning quality and makes the candle unstable. When practicing how to make a candle wick, patience is very important.
Another mistake is skipping the drying step. A wet wick cannot burn properly and may cause uneven flames. Some people also use synthetic threads, which is not a good idea because they can produce smoke and harmful fumes.
Incorrect wick thickness is also a common issue. If the wick is not matched with the candle size, it will not perform well. Taking time to test and adjust can help avoid these problems easily.
Conclusion
Learning how to make a candle wick at home is a simple but very useful skill. It allows you to create better candles with steady flames and cleaner burning. Once you understand the process, you can experiment with different materials and sizes to improve your results.
With practice, you will notice your candles becoming more professional in quality. Homemade wicks give you full control over how your candle burns, which makes the whole experience more satisfying. Whether you are making candles for personal use or as a hobby, mastering this skill adds real value to your work.
In the end, candle making becomes more enjoyable when you understand every small detail, especially the wick. With patience and practice, you can easily perfect how to make a candle wick and create beautiful candles at home anytime you want.
Read More: Dollartimes.co.uk